Virtual Polimod: Superinteractor manual

The super interactor is the main interface of the virtual Polimod environment. In this mode, it is possible to create, open, move and remove modules. The button functions are different in this mode than when in a module.
When the application opens, it will be in the super-interactor mode. Different buttons in the matrix may appear lit in different colours, while some other buttons may appear unlit. These coloured buttons represent one module each. Modules can be selected by tapping them.
entering and leaving a module
When in the super interactor mode, it is possible to open the interface of a module by tapping the button that represents the module, and then pressing the “patching” button.
When a module is in focus, pressing the patching button, closes the module and goes into the super-interactor mode
tip: it is possible to switch from one module to another fast by holding the patching button, and releasing it after the desired module’s button was pressed.

-
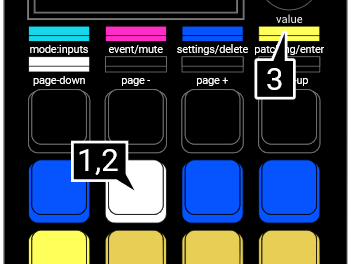
in super-interactor mode, tap the matrix button which appears blue. That colour usually represents a sequencer.
-
the button matrix that was previously blue turns white
-
now press the “patching” button.
-
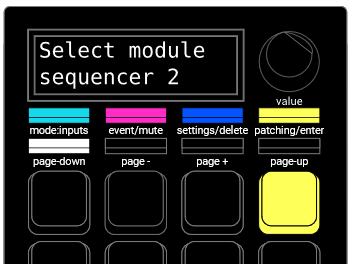
The contents of the screen change, and the buttons matrix turn off, displaying a yellow play-head which advances in the matrix. This means that the calculeitor is focusing a sequencer.

connecting and disconnecting modules
A relation can be established between modules by using the super-interactor mode. It is only possible to select outputs for each module. Connections among modules can be seen by selecting the module: the other modules that turn red are the modules that are connected as outputs of the selected module. These connections can also be toggled by holding the module’s button and pressing the output module’s button while that button is being held.
-
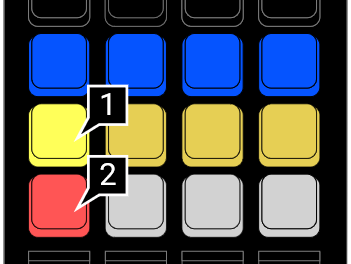
In super-interactor mode, select the module named harmonizer. It is coloured yellow.
-
Observe that one module turns red. That module is the midi output module.
-
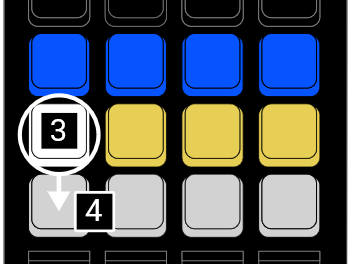
press the selected harmonizer button again. While that button is held, press the midi output module button (which is currently red).
-
The midi output module button turns grey. This means that these two modules are not connected anymore.

 connecting steps 3-4
 -
Repeat the step 3. The midi output button turns red again, meaning that the harmonizer is connected again to the midi output.
-
Repeat this operation with other modules. Try connecting and disconnecting.
tip: it is possible to see the input modules by selecting the module in question, and then pressing the mode button. The input modules in this case will turn cyan (light blue)
deleting modules
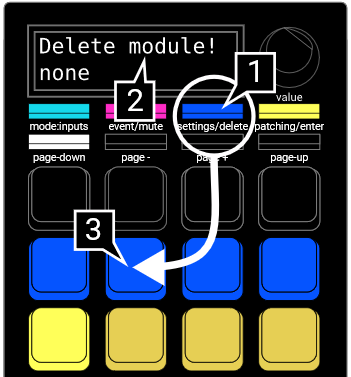
Modules can be deleted and created. To delete a module, tap the module’s button while holding the “settings” button.
-
In super-interactor mode, press the “settings” button, which appears blue.
-
the screen displays the text “delete module!”
-
press one or more than one module button in the button matrix, while still holding the “settings” button.

 deletion of modules, steps 1-3
 -
when the “settings” button is released, the selected modules will be deleted.
tip: when a module is selected for deletion, it gets muted. The deletion of a module can be cancelled by tapping it’s button again. Note, however, that once the “settings” button is released, there is no undoing.
creating modules
The creation of a module follows two steps: selecting an empty button (which is not lit), and then selecting the desired new module type throughout the module creation menu.
-
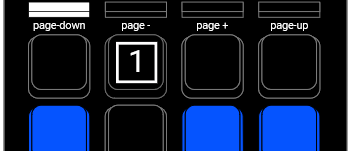
while in super-interactor mode, tap a button in the button matrix which is not coloured (unlit)

 creating module step 1
 -
the button matrix changes colours. It is now displaying the available modules to create.
-
tap many buttons in the button matrix. The name of each module will be displayed in the screen. Each module type is represented by a colour as well.
-
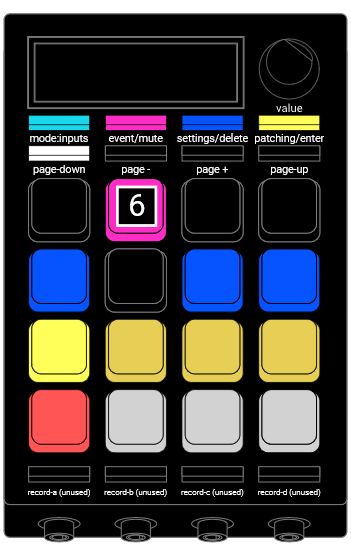
select the magenta button, which is named “Narp”.
-
Press the “patching” button

 creating module step 1
tip: inside the module creation mode, it is possible to exit without creating a new module by pressing the “settings” button. This closes the menu, and goes into super-interactor mode again.
-
Calculeitor goes back to super-interactor mode, and the new module appears in the matrix button that you pressed initially.

 creating module step 1
extra points: connect the new Narp module to any of the modules that are displayed yellow. Then, enter into the Narp and try pressing some buttons in the matrix! Then try changing the output of that Narp to different modules.
tip: if there are more than 16 modules available, the creation menu has pages which can be explored by pressing the “page” buttons.