Modular sequencer: First physical prototype
This article is still in development. You can help me make this content more understandable and organized if you feel like.
TLDR: There are videos in the bottom of this post.
Context
Within the development of my thesis project, the modular sequencer, I needed to have a flexible tool that allowed me to design the interaction with the concept of a modular sequencer. This tool needed to present the same type of interaction that I would expect from the final product, in order to test the real performability and limitations for this concept of interface.
Development
Starting point
The interface design is based on the classic and popular 16 grid scheme, (found on interfaces like MPC's grooveboxes, Ableton contollers, et cetera) that I expected that would allow many different forms of interaction with a sequence. I chose a classic interface, and didn't try to innovate in this aspect, because I wanted to focus most on the quality of modularity rather than a new method for interaction. Once there was a modular system, perhaps a new mode of interaction would become evident.
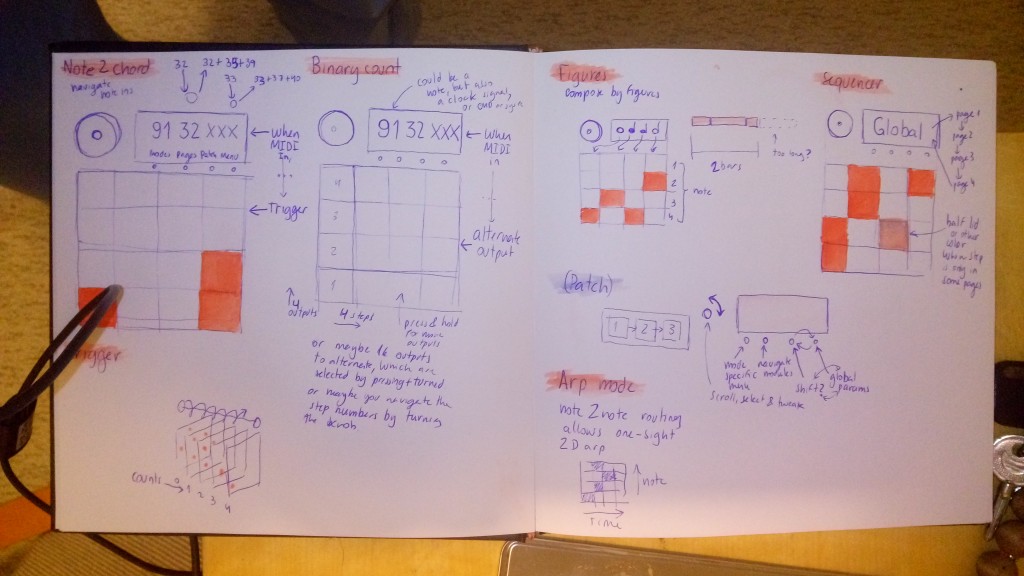 Designing ways of accessing a new way of programming beats through a classic interface that now is modular. There are many pages of this, but the notebook got lost. However, I remember all.
Hardware
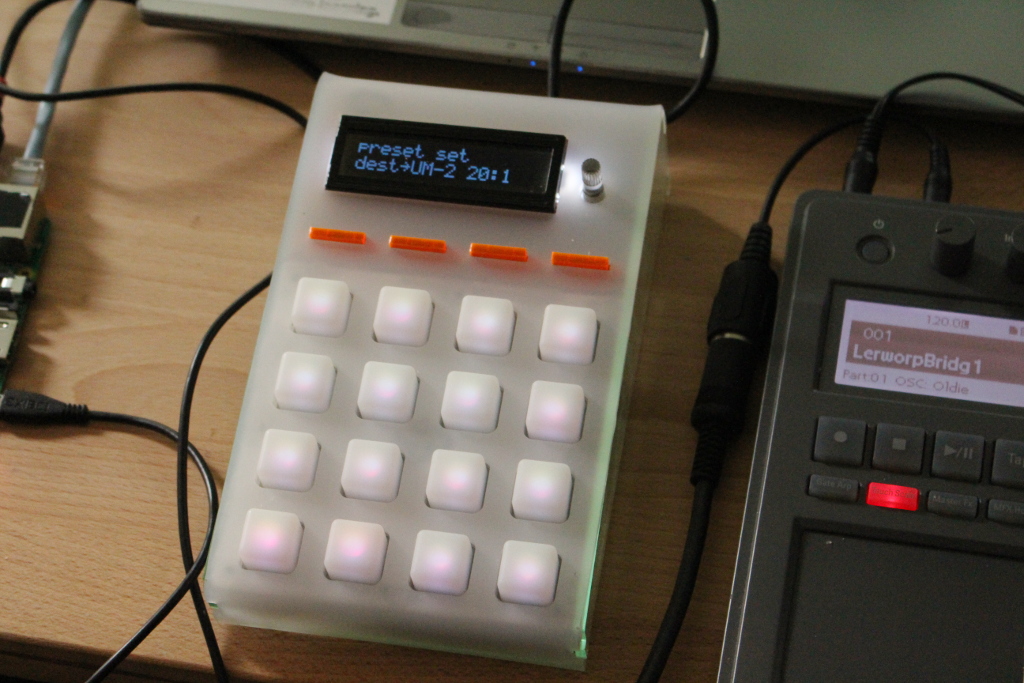
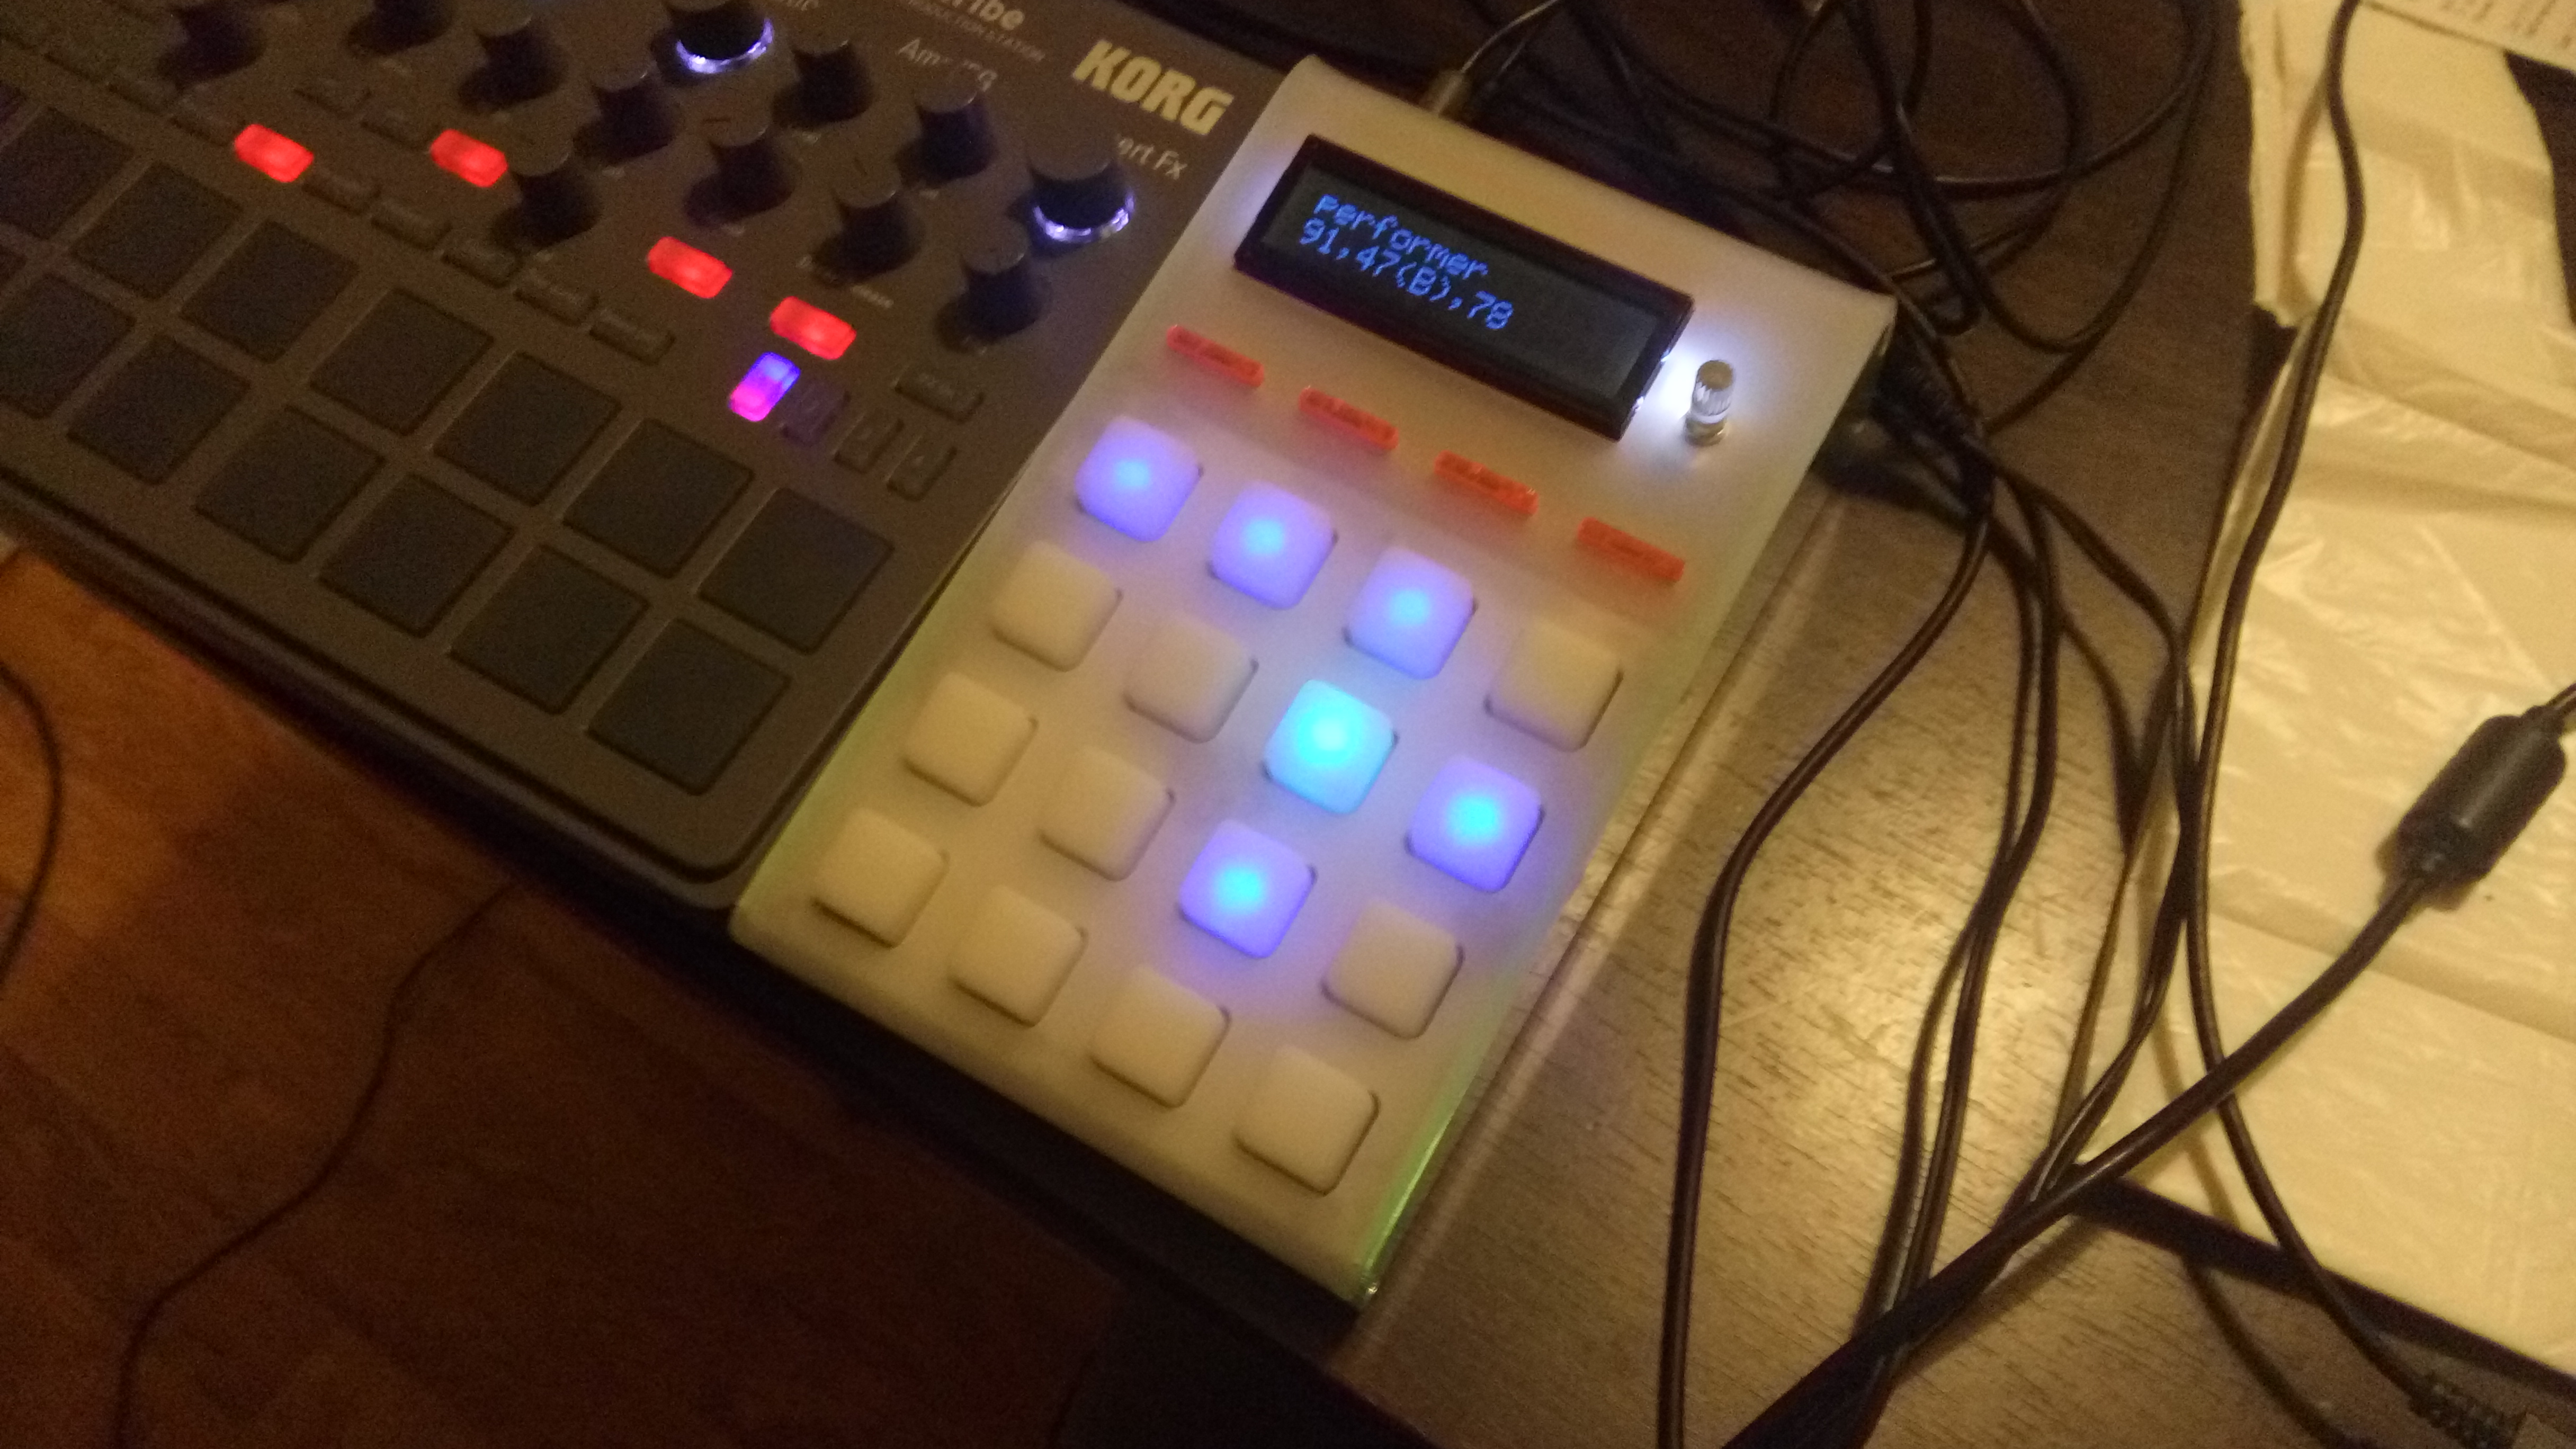
From my experience performing with Maschine, I knew that the minimum components for such an interface, would be tact-switches, backlit buttons arranged in a grid, an encoder, and a screen. I sourced these parts from SparkFun, since they test each individual part to make sure it works.
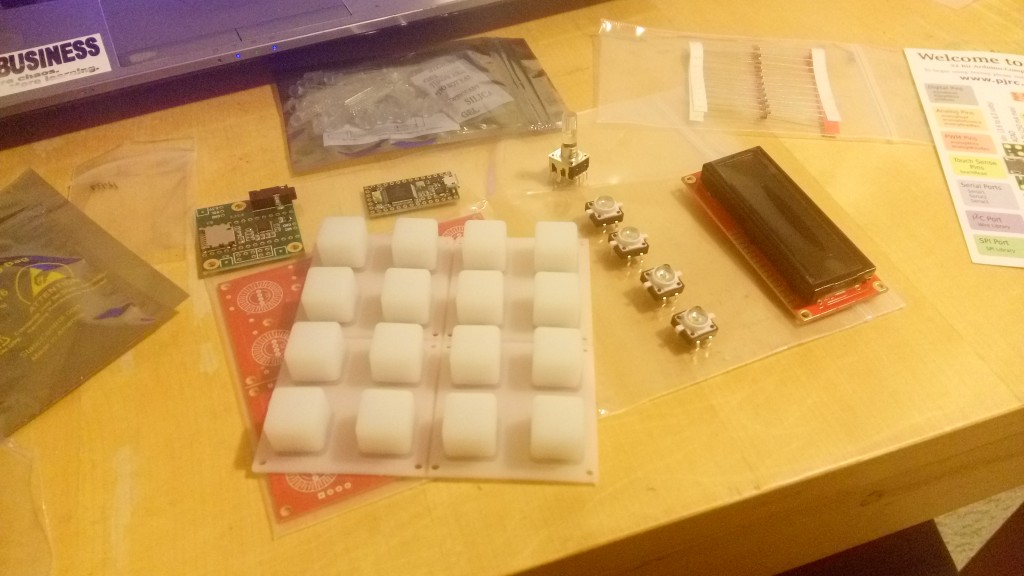
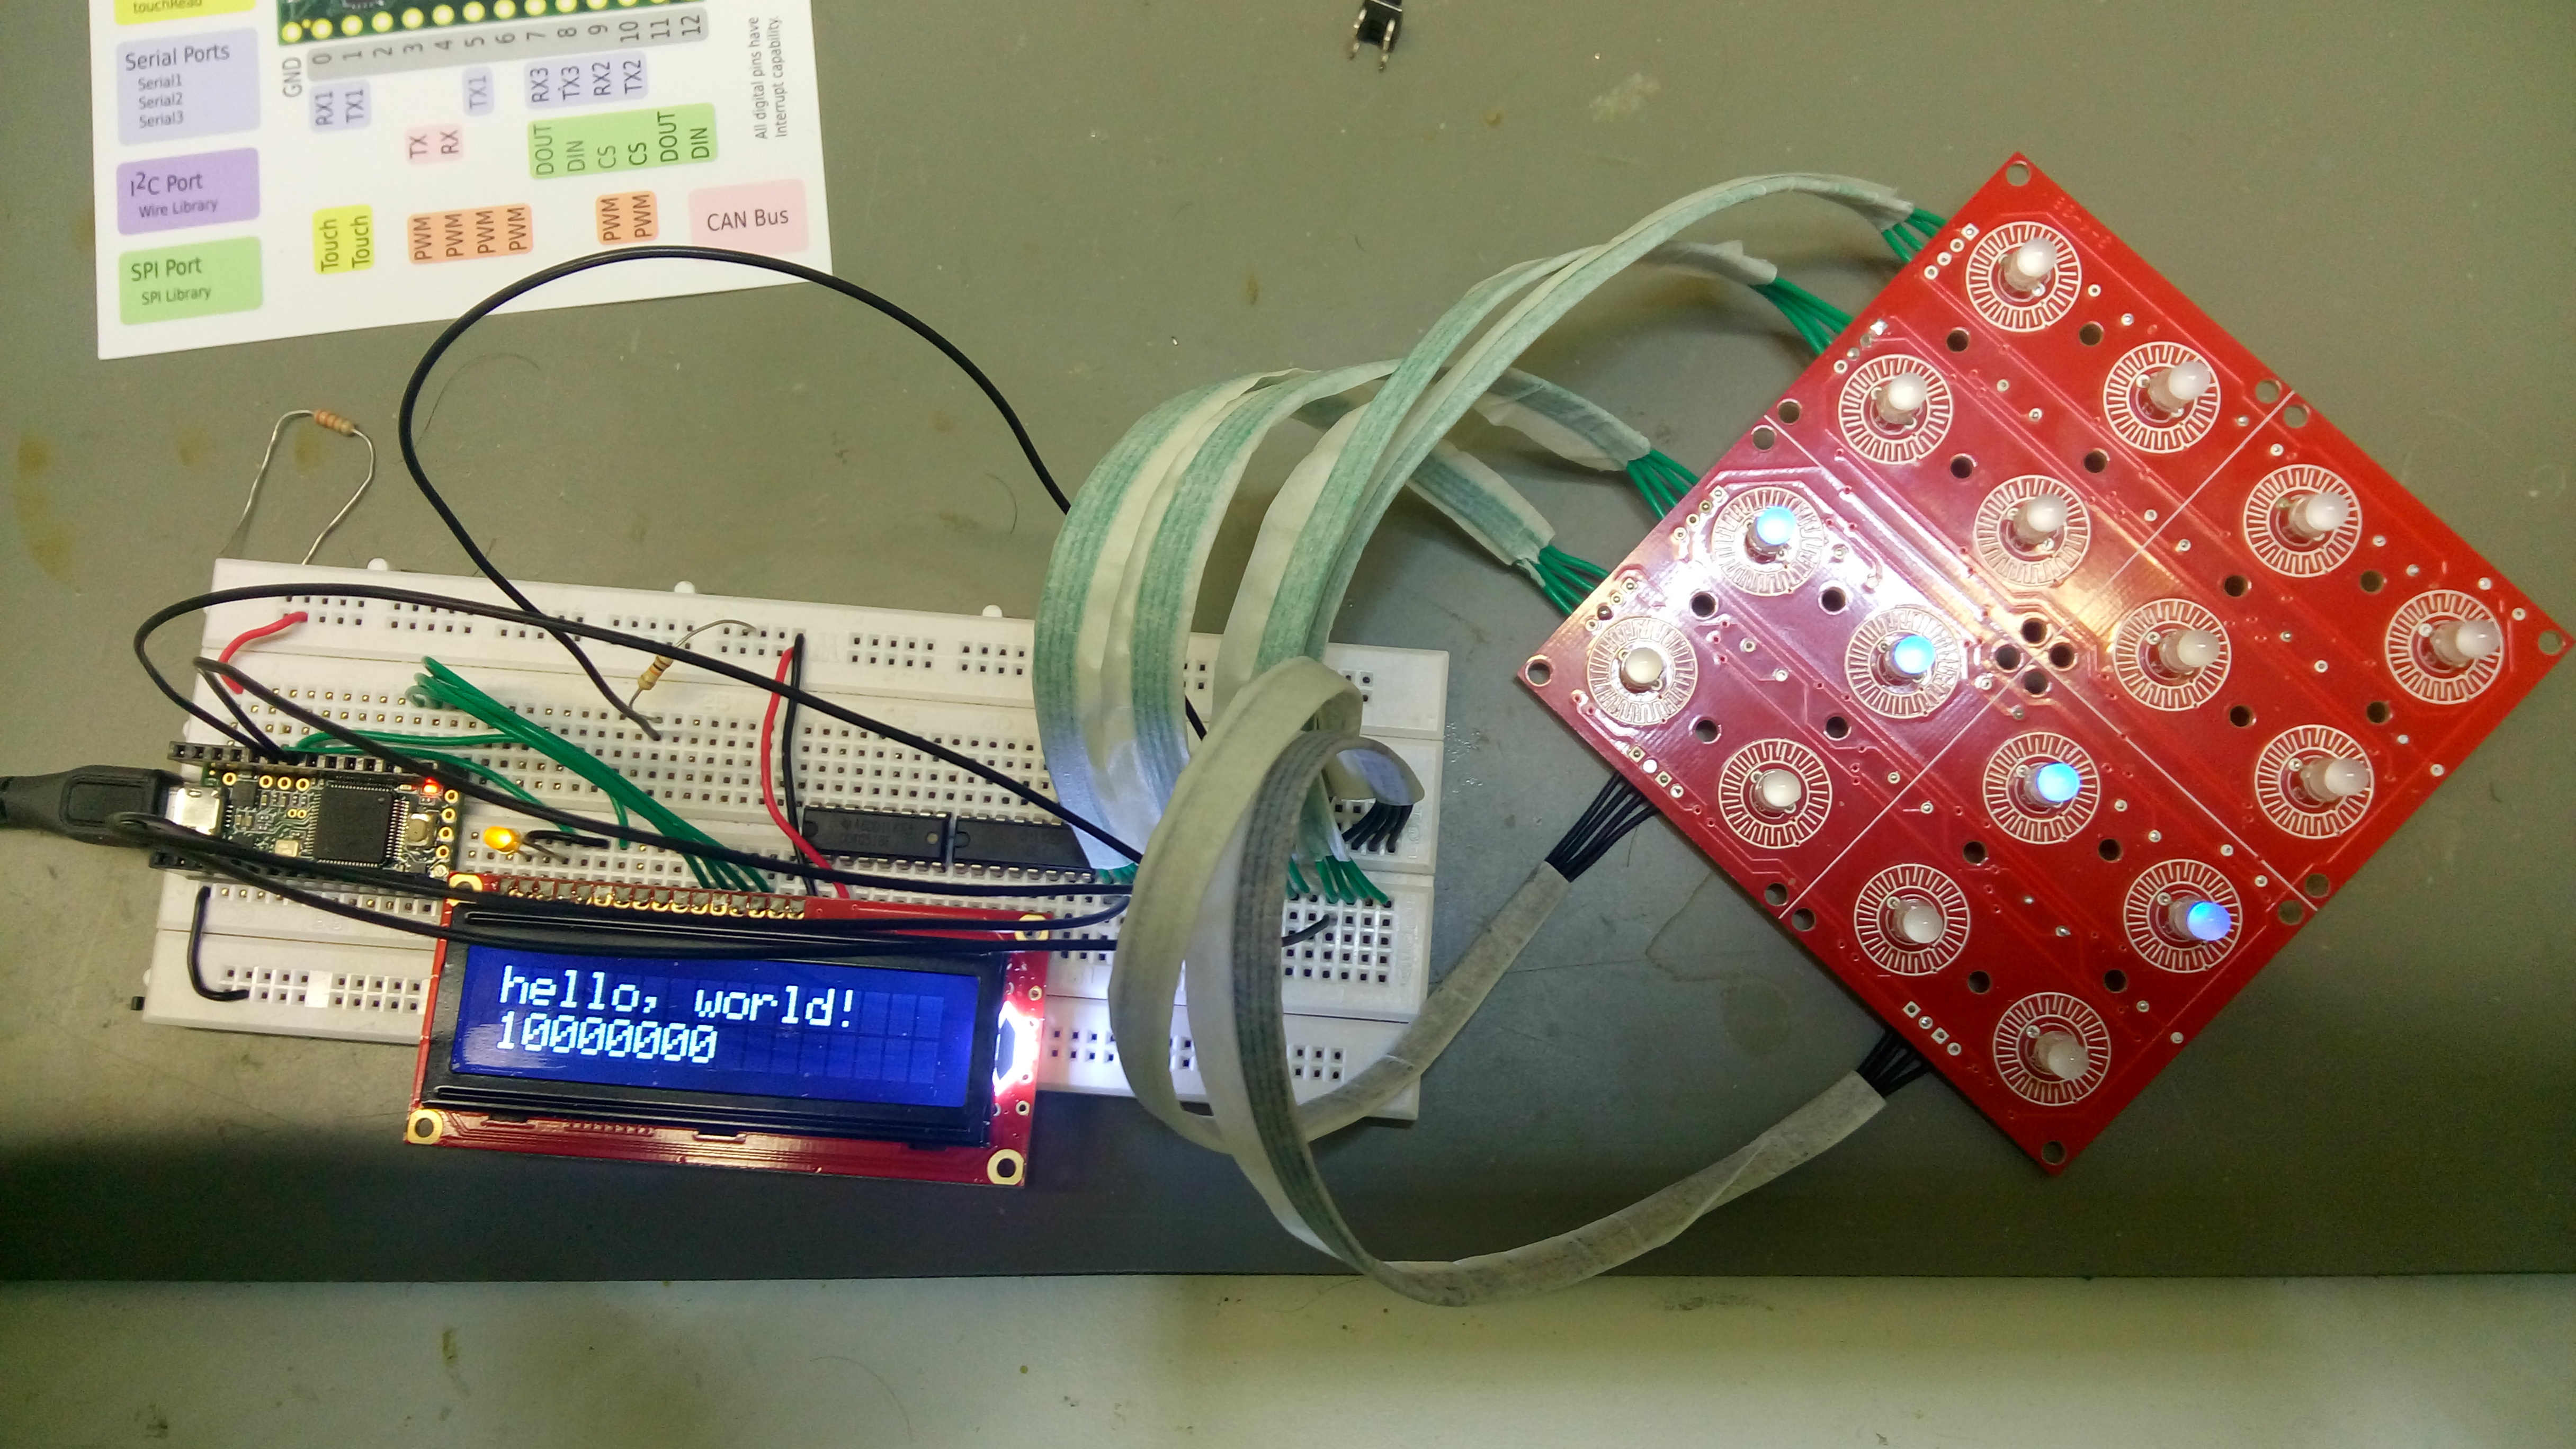
Connecting all the three LED colours, plus the button, for all the 16 buttons to a microcontroller that has limited pins is a challenge.
The four (LED and button) matrix are connected by using a multiplexer. I first tried the 4051, but later I discovered that I need to use 4067, because they have more output channels. The algorithms that I designed to write bitmaps into a multiplexed LED matrix are interesting, and may become a post in the future.
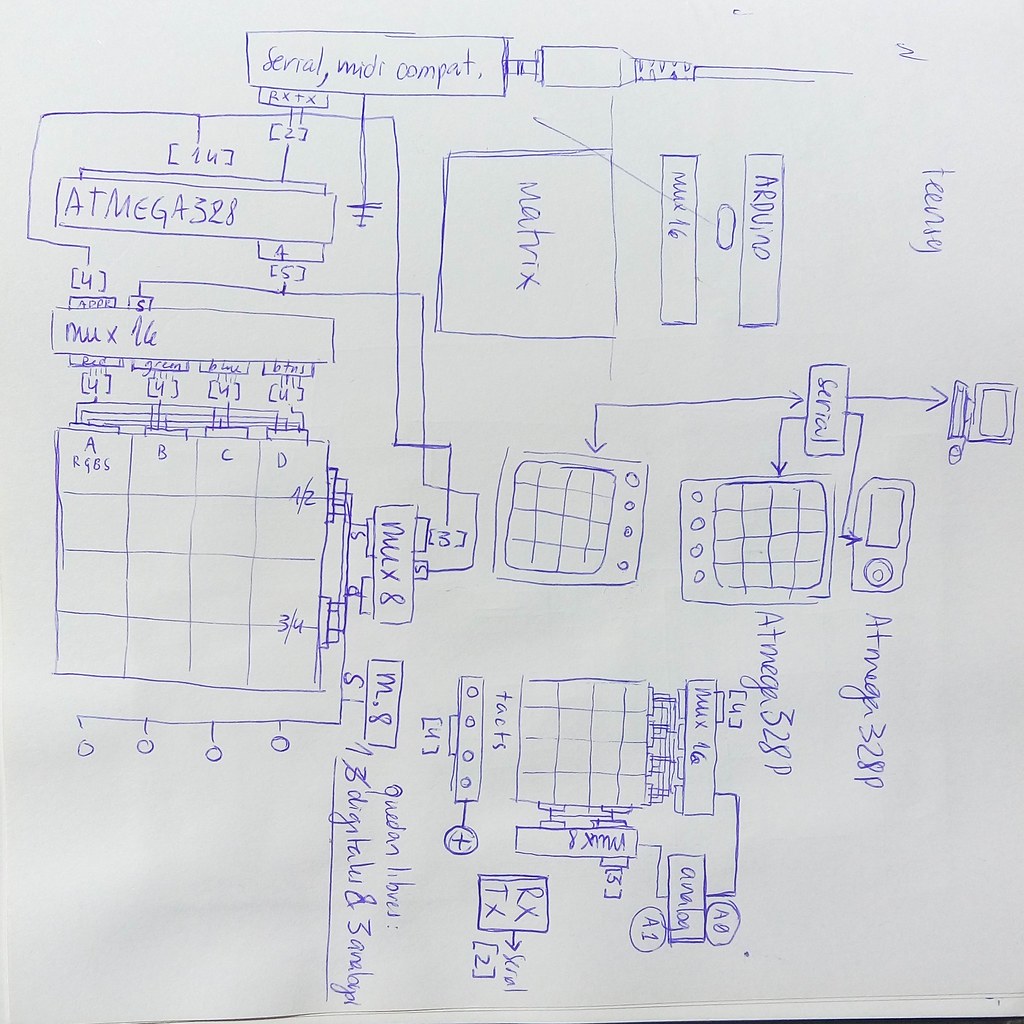 I started using Teensy Microcontroller, but I learned that unlike Arduino, the correlation between pin registers in the microchip, and the physical pins is scattered. This is because Teensy is based on ARM; and it maps PIND write-ups into singular DigitalWrites, which makes it useless for my case where I need to use multiplexors, and read the states of the ports. If I will focus on making a sequencer, and not audio applications, I may want to use Arduino instead, because there I can just use the pins in the order that belong. In other hand, if i want to make a custom board for the sequencer later, it will not matter the physical placement of the pins. Teensy also is not open-source as Arduino.
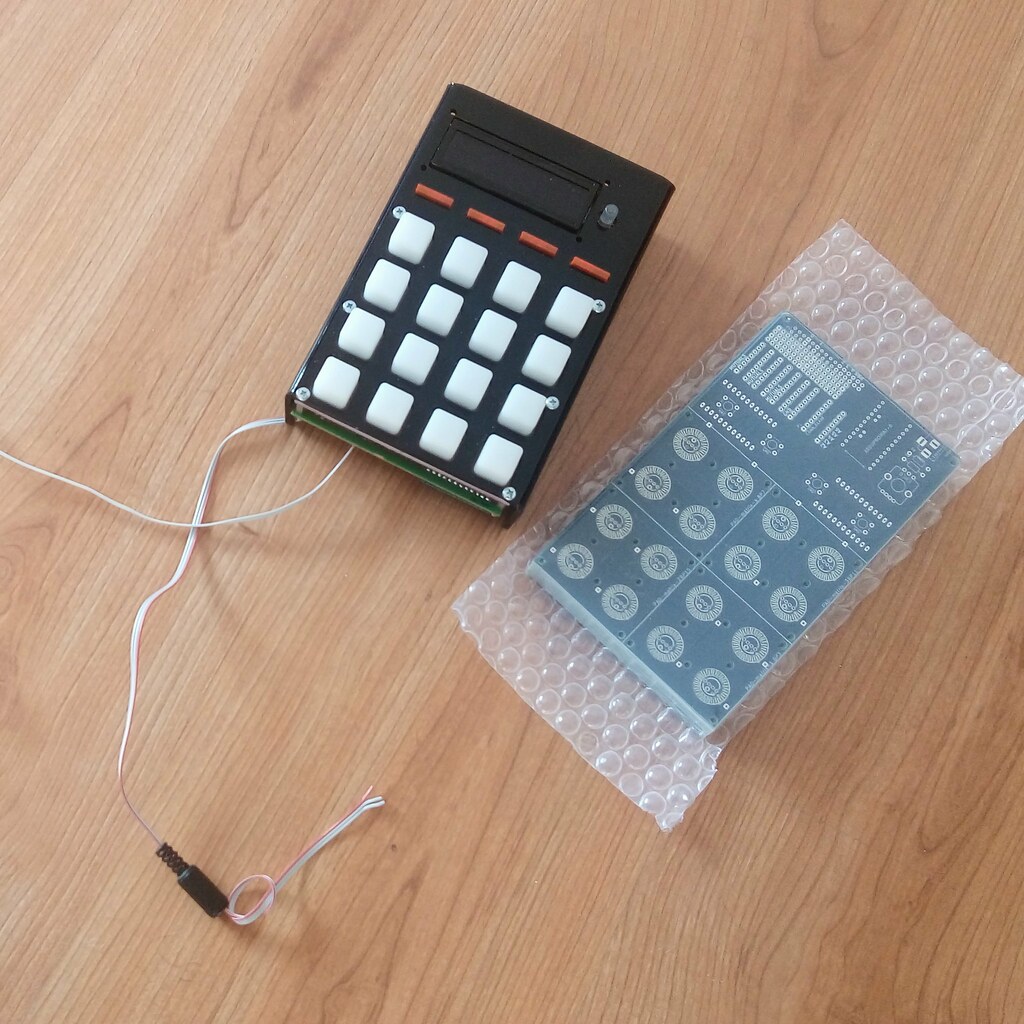 First working prototype. The Board was designed in Kicad and manufactured in China.
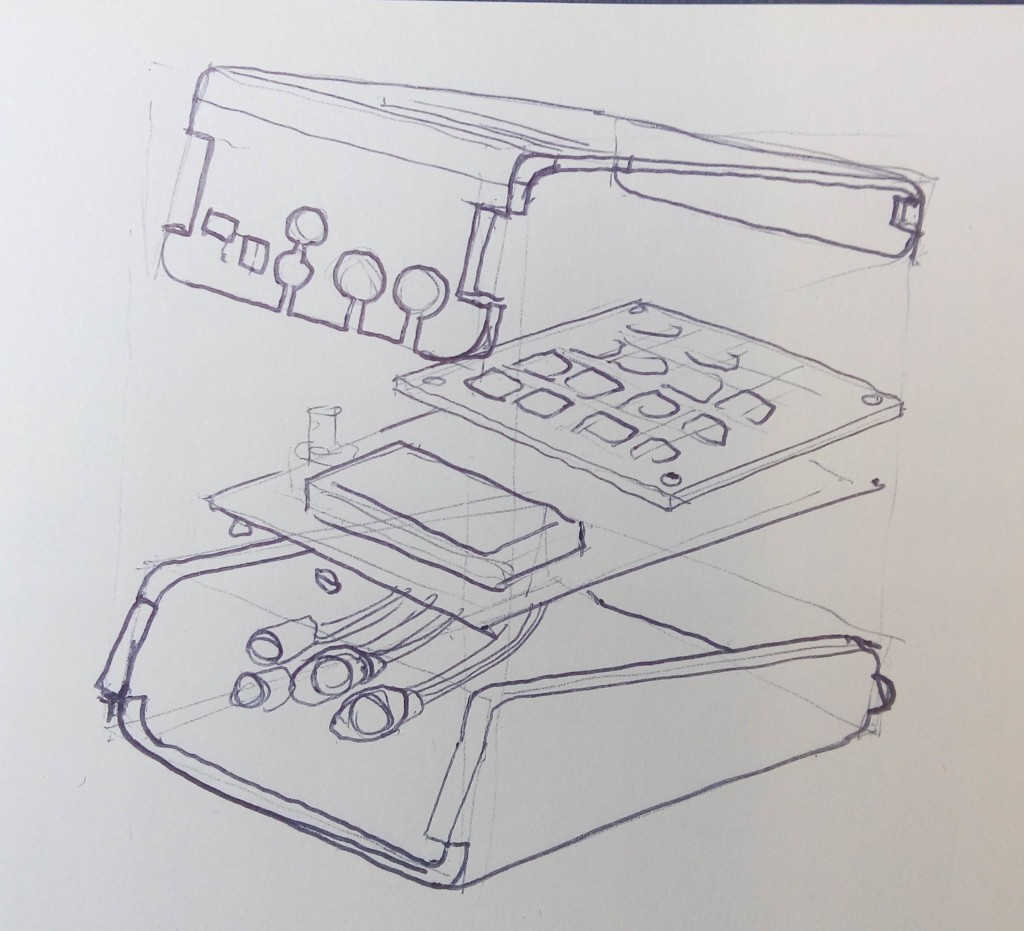
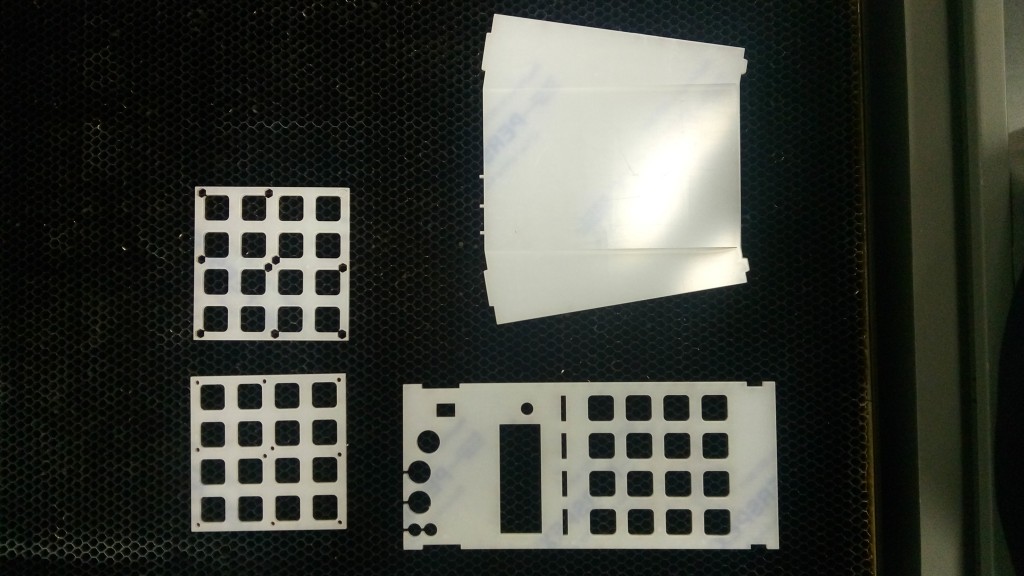
The case was made out from acrylic. It was laser-cut and bent in Aalto's FabLab.
 Once built, the prototype started posing interesting problems, and I could start finally defining to the detail how the interaction happens.

This prototype was first intended to work solely based on an AtMega328P microcontroller, but the dynamic memory of the chip was not enough. The chip could hold a 16 step sequence, and be synced to an external MIDI clock, while sending and receiving MIDI. I could even send control commands by using the conductive silicon pads as pressure sensors. The problem is that the LED's worked on the basis of persistence of view; and when I needed to make more complex interaction patterns, the LED's would start flickering heavily and getting more dim. The Atmega328 dynamic memory was also insufficient to hold patterns that would have polyphony, or a length greater than 16 steps. I started using every possible memory optimization technique, which in turn would make the LED's flickering problem worse. In short, the capacity of the AtMega328 was insufficient.
Apart from specifying that I need to start using AtMega2560, I needed to put the concepts into a test without spending more time and resources before knowing if the concept works first. This is why I reprogrammed the firmware of the board to become an interface, and all the rest would be handled by a Raspberry Pi running a Node Server. It was challenging because the first design used the entire PORTD to write the address into the two 16 channel multiplexers. In this microcontroller, the PORTD 0 and PORTD 1 are the Serial communication ports. Before switching to a raspberry, there was a long story of trying to use two Arduinos, or use SoftwareSerial ports for communication, etc. The best solution at the end was to free the two first PORTD pins, allowing a seamless hardware serial communication between the Arduino and a Raspberry.
Evolution of the interaction
Microcontroller stage
When I started working on the interaction in the AtMega328 chip, I was expecting that the modules would communicate one with another using MIDI. This version of the interface had three modes, or layers to design a pattern: one layer had a sequence, another layer defined the translation from the sequence to the MIDI output (e.g. {1:[0x90,0x46,0x90], 2:[0x90,0x48,0x90], 3:[0x90,0x50,0x90]}) and other layer defined a harmonic structure, for if one needed to alter the correlation harmonically. Then I started realizing that perhaps each one of these layers are the actual modules, and thus, the sequencer could be exploded into many others, and create a even more versatile environment. This is what incentivized the sequencer environment experimentation. Here I developed the idea of modulus based composition of patterns.
Virtual Modular stage
The second stage, using Node Js would instantly suggest making this more granularized mode of interface, because how JavaScript works. After the sequencer environment experimentation, I could start making a modular sequencer. Only that the modular environment was happening inside the same device, to make prototyping more easy. Needless to say, this interface is very hard to use, and reveals the reason why the modules should be physical modules instead of virtual module inside a physical interface. On the other hand, this interface was very fun to play with, and I could accomplish the task of making an improvised live performance of electronic music, with all the events coming from this single interface many synths. 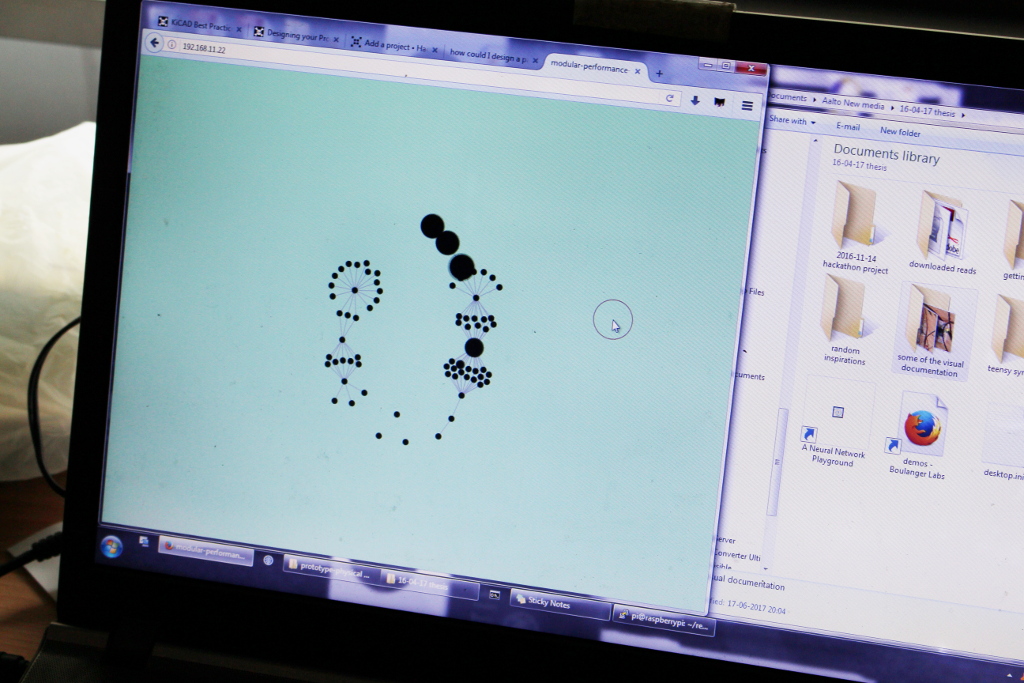
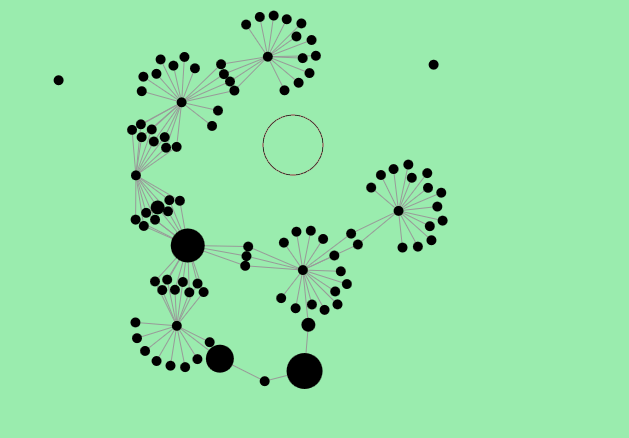
The prototype reveals the internal modular structure using a socket server
The Node app was designed to communicate bidirectionally via serial with the prototyped interface, to handle all the interactions, the pattern making, the modularity and the generation of the midi events.
Same as in my first software prototype experimentations using web browsear versus server, I fell into the realization that the most important modules to hold an interesting performance, within my own musical explorations, are the sequencer and the preset kit. The interesting fact about these two is that perhaps they could be programmed with the same backend, making both modules effectively two uses for a same system. the difference, however relies in how the user interface is implemented; which is somehting that I was not able to see with the case of the virtual user interface prototype. While the sequencer benefits from user interaction features such as modulus, pattern length and pattern fold. The preset kit in the other hand benefits from interaction protocols such as fast incremental add of new presets and muting presets. Duplication of events can make sense for some creative applications such as being able to mute only some events which sound the same.
Some relational user interfaces among these two module types are:
- from sequencer to presetkit, exploding events, where each event in a sequencer is proxied by a presetkit event. This process consists on finding all the same events that are distributed along different steps in a sequencer, and assigning a new preset in the presetkit for each different one, whilst replacing the sequencer events for presetkit events that correspond to the relplaced event. The idea is that the end sounds exactly the same as the first one, but only this time, presetkit transformations are allowed whilst previously it was not possible
- from presetkit to sequencer, the recording, where each presetkit played note is recorded as a presetkit event in the sequencer at the time that corresponds.
I learned also that there needs not to be a distinction between performer and presetkit, because presetkit works better by fulfilling both functions (as user, one needs to be able to try the notes that one has been programming, hence a presetkit is also a performer)
During the protoyupe, I learned that the clock events are very complex in such an environment, because not only one clock signal is sufficient for performance, one needs two type of clock events, which are relative and absolute clocks. Also the clock in a sequencer needs to work in three levels:
- (bpm clock) is imaginary. When defining the BPM of a pattern, one defines the rate for a ‘black’ note. four step clocks(in case of 4/4). I tried to eliminate the need for this distinction by representing the bpm and showing a muiltiplication factor (e.g. 120*4 BPM)
- step clock, where one step represents the advance in one pattern memory step
- sub clock, while can be equivalent to the step clock, it might be divided into substeps, if we need for example that a sequencer plays at half the rate of another sequencer, we will need that more than one subclock per step. A mainstream implementation of this, is the step divisor on a korg volca fm. Actually most market sequencers offer the ability to divide steps.
- micro clock, that belongs to the clock sync signal. This clock can happen 12 or 24 times per quarter note. user is rarely aware of this.
The resulting prototype was very interesting to explore. For my explorations, I could find only these emergent interactions that bring innovation to composition
- sub sequences, where one sequecner makes other sequecner to jump to determined steps, bringing the ability for rich polirythms that can be played on realtime
- changes in scale on the live context
- progressive displacing of the pattern. The sequencer should implement interface warping so the strong beats can be centered again in the even buttons.
- shooting of sequences that run at different rates. This suggest the implementation of patterns that play only once
- multiple references to one same event, that allow muting events in a sequence
- changing all instances of the same event in a sequencer by tweaking the presetkit
- muting some sequences while keeping other sequences alive
There are also innovations regarding the user interface, that can’t be implemented if the environment is not modular
- absolute and relative clocks
- subsequences
- exploding sequence into preset kit
- recording preset kit into sequence
- phrase chaining or sequencing (1-2,1-2,1-3,1-4) that was not tested due to how hard it is to use the current interface
Finally, there are the innovations that could be used in current sequencers:
- Modulus (loop look) composition & length folding/ unfolding, that allows repetitions with small variations on each repetition while still allowed to change all repetitions of a same event in the next “sub-loop”
- Remapping of sequencer harmonies.
This prototype led me to some conclusions regarding the user interface:
- the output of modules should be only one. At first, I made the sequencer so any independent event could have any output, and any presetKit preset could have any output aswell. It allows more flexibility, but makes performance much slower.
- There needs to be a restart button on sequencers, or a button to re-coordinate the sequencers, because when a clock is relative, a sequencer may be running in coordination, but out of phase from the other sequencers. This makes sequencing more than one layer very tricky.
- There is also a need to wrap a sequencer around. This means, shifting all and each sequencer event, some steps forward or backward in time, but jumping the events to the opposite end of the sequence if they reach the sequence edges (first and last step).
Example of performance using the prototype while displaying the structure as a visual.
Example of performance with a closer look at the mode of operation.